
HTML5 Racer - Adding a Track and Colliding with it
19th Feb 2013
I began building a very [simple HTML5 racer game][2] back in November. It was my first exploration in to doing simple games with HTML5 and canvas.
It has lay dormant for a while, I'm going to take it another step further and put the car on a track in this article and inflict some speed drag when the car is not on the track.
In this series:
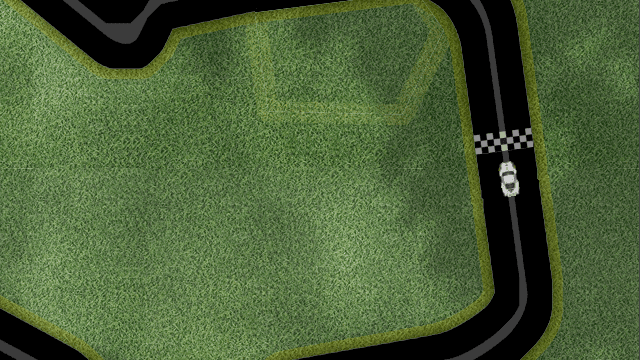
A track
So open up your fave image package and draw a track. I searched for the Silverstone Circuit and simplified it a bit. I ended up with this:

Once you have your track you need to draw the track under the car so I modified the game's draw function (within racer.js) with the appropriate drawImage call.
// reference the track image
var track = new Image();
track.src = "track.png";
...

function draw (car) {
    context.clearRect(0,0,ctxW,ctxH);
    // draw the image on the canvas context
    context.drawImage(track, 0, 0);
    ...
}
You then just need to place the car at the starting line.
Hit mapper image
I picked up a trick from Thibaut Despoulain where he used an outline image of the track where the colour at a certain pixel coordinate represented the drag on the vehicle.
It's easiest to explain with an example. Below we have part of the track with the hit map image overlaid. I have also added in two red points which we will use to check whether the car is on the edge of the track.

What we want to achieve is to check the pixel data of the hit map at the x/y coordinates of each red dot. If the pixel is white, we do nothing. But if the pixel is black then we apply drag to the car.
You can probably imagine that this technique could become quite sophisticated with varying shades of grey, and potentially utilising the RGB values of the data for different purposes.
isHit function
Let's keep this simple for the sake of this example and just write a function which tells us if a particular x/y coordinates is over a black pixel.
We can then use getImageData function to query the image data of the hit map.
var myImageData = context.getImageData(left, top, width, height);
We need the image to have been drawn to a canvas already and we can't really use the canvas we already have for the game. Fortunately we don't need a canvas element which is in the DOM, so we can just generate one on the fly for this purpose.
Here is an example HitMap class which can be used for each hit map you may need.
function HitMap(img){
  var self = this;
  this.img = img;

  // only do the drawing once the
  // image has downloaded
  if (img.complete){
    this.draw();
  } else {
    img.onload = function(){
      self.draw();
    };
  }
}
HitMap.prototype = {
  draw: function(){
    // first create the canvas
    this.canvas = document.createElement('canvas');
    this.canvas.width = this.img.width;
    this.canvas.height = this.img.height;
    this.context = this.canvas.getContext('2d');
    // draw the image on it
    this.context.drawImage(this.img, 0, 0);
  },
  isHit: function(x, y){
    if (this.context){
      // get the pixel RGBA values
      var pixel = this.context.getImageData(x, y, 1, 1);
      if (pixel){
        // we consider a hit if the Red
        // value is 0
        return pixel.data[0] === 0;
      } else {
        return false;
      }
    }
  }
};
You would use it like this:
var hit = new HitMap(trackHit);

// later
hit.isHit(200, 200) // => true / false
Making the hits affect the car
I think I will round this off with a peek in to how this could be used with the car object. I'll do another post investigating this.
The car can be set up with a few collision points at key places (front, back, left, right). We could then check if any of them are hit and apply the needed affect on the cars speed and direction.
// collisions
if (car.collisions.left.isHit(hit)){
  car.steerRight();
  car.decelerate();
}
if (car.collisions.right.isHit(hit)){
  car.steerLeft();
  car.decelerate();
}
if (car.collisions.top.isHit(hit)){
  car.decelerate();
}
if (car.collisions.bottom.isHit(hit)){
  car.decelerate();
}
Test it out
The latest version can be found on https://davetayls.me/html5racer/ and you can take a look at the code on the Part02 tag